Author Archives: Jessica Snell

“Hellebores make the Winter worthwhile”

The fascinating elegance of Hellebore is head and shoulders above any other winter flower. Just as the season is getting tedious, with holidays over, hellebore emerge. Standing tall in a season of garden dormancy, they quietly remind us of wonderful things ahead.

Hellebore Tips

Lenten Rose – Helleborus orientalis. A Spring flowering hellebore with cerise pink flowers.

The colors of Helleborus orientalis are the most scintillating, so start with good original plants before allowing them to hybridize. As long as you like the colors, it doesn’t matter about their names.

Because the flower heads tend to look downwards, grow hellebores on a slope, preferably outside a window. Newer hybrids have been developed so that their flowers are held upright.

Hellebores mix well with other early spring flowers, under deciduous trees or shrubs. Freshly mulched soil sets them off to best effect.

Imitate a woodland floor by providing sheltered, moist, and well-drained conditions which are mulched with leaf-mold or bark chips.

Trimming old foliage which has grown large and coarse over the summer not only removes potential disease, but reveals the flowers to bees and other early pollinators.

Hellebores love to reproduce. Deadhead flowers as seed pods ripen or raise new seedlings from a particularly good plant. Remove any new color combinations that are not special.

When transplanting hellebores directly from their nursery containers, be sure to shake off the potting mix and free up any bound roots.

Be careful not to plant your hellebores too deeply as this can hinder flower production. Make sure the crown of the plant is just slightly buried beneath the soil.

Plant with companions such as snowdrops, crocus, muscari, daffodils, phlox and bleeding heart.

Growing Potatoes

Have you ever tasted home grown potatoes? Most say there is no comparison to store bought potatoes. Home grown potatoes are fresher, more flavorful and healthier for you. A small number of seed potatoes will yield buckets of potatoes ready to eat and enjoy and can even be stored throughout the winter months

Soil Requirements

  1. Potatoes must have well-drained, moisture retentive, fertile soil that is high in organic matter and a pH between 5.0-6.0. Do not use a lime soil, the soil should be slightly acidic.
  2. To prevent disease problems, do not plant potatoes in the same area as tomatoes.
  3. Potatoes should be rotated on a 3 year program.

WHEN TO PLANT POTATOES

Potatoes prefer cool weather. Typically for our Zone 6, St. Patrick Day is a great time to start planting potatoes. You should always remember….

  • The soil, not the calendar, will tell you when it’s time to plant. The soil should not be so wet that it sticks together and is hard to work. Let it dry out a bit first. Like other seeds, potato seed pieces will rot if planted in ground that’s too wet.
  • Soil temperatures should be reaching the 50 degrees mark, before the potato would start to grow.

Seed Potato Preparation

  1. Before planting place your seed potatoes in a warm location (between 60-70 degrees) in full sun, such as a kitchen window sill for one to two weeks. This will induce sprouting to make it easier in the following steps.
  2. one day before planting take a sharp, clean knife and cut the potato into planting pieces or “seeds”. Each piece should be approximately 1.5″-2″ and must contain at least 1 or 2 eyes. (Eyes can be identified as the indentations or dimples on a potato. These indentations lead to sprouting buds, that will eventually make there way to the soil surface and be the stalk to the potato leaves.) Small potatoes with a minimal amount of eyes may be planted whole.
  3. Allow “seeds” to dry (1-2 days) and form a callous over their cuts.

Planting Tips

  1. Dig a tench 12″ deep and add compost at the bottom of the trench where it will be most beneficial to the newly forming roots.
  2. Place potato seeds 18″ apart (if intensive planting 9″ diamond pattern)  and 4″ deep inside the trench, with the cut side down and eyes pointing upwards. Don’t fill the trench completely.
  3. Depending on the soil temperature, stems will emerge from the potato seeds with in two weeks. At this time add another 3-4″ of soil into the trench.
  4. After another 2-3 weeks add 3-4″ more of soil on top and around the potatoes.
  5. Monitor the potatoes, add soil or mulch (pine mulch or straw) as needed to ensure new potatoes forming are not exposed to sunlight. If young potatoes are exposed while developing , they will turn green. This green portion may be toxic if eaten.
  6. Water you potatoes well and frequently, keep them weed free (as weeds steal nutrients from them).

Helpful Tips

To mazimize your crop, keep potatoes well watered throughout the Summer, but especially during the period when they are in flower and immediately thereafter.  Water early in the day, this allows foliage to dry completely before the evening.

Potatoes grow great in containers and Potatoes  Bags!

The best starters are seed potatoes. Do not confuse seed potatoes with potato seeds or grocery produce! Select seed potatoes which have protruding eyes (buds).

Harvest Time

In general potatoes should not be harvested until two weeks after the foliage has died back. This allows the skin to set and reduces skin peeling, bruising and rotting while in storage. After harvesting immediately store in a cool, dry and dark place.

Gently dig around the plant and pull up the largest potatoes (for cooking use) and allow smaller ones to remain in the ground and keep growing.

If by the end of September the foliage has not died back, all of the foliage should be cut to the ground to ensure the crop has ample time to mature before winter. 

7 Stylish Plants to Keep Winter Blues Away

Give life (literally) to a bare wall, empty table or dull corner in your home. Easy to care for houseplants are the most stylish home accessory splashed across pages of design publications, blogs and Pinterest! Forget the dusty, artificial Ficus tree or droopy hanging plant at grandma’s house. Houseplants are on trend and an easy way to add high style to your home.

Chinese Money Plant, with its striking large circular smooth green leaves, is one of the trendiest plants at the moment. Its full name is Pilea peperomioides and they enjoy bright light and moderate to low water. They are perfect friendship plants as it’s easy to pop a leaf off to give to a friend to propagate.

Fiddle leaf figs have taken the spot in many design magazines and for great reasons. Their bold green leaf can pair with any numerous pots and lend itself to a modern sleek look or a cozy cottage feel. These plants are fairly easy, just place them in indirect light and let them get dry between watering.

Calathea: A bold and beautiful houseplant, calathea looks good even without flowers. There are lots of varieties of calathea, but one of the most common has luscious, dark green leaves that have scalloped edges and silver brushmarks on the top of the leaves. Underneath, the leaves are a lovely shade of burgundy purple. Each one is a living work of art! Grow calathea in medium to low light. This beautiful tropical doesn’t like much sun on its leaves, so shield it from direct light to prevent sunburn. Water calathea enough to keep it moist, but not wet or saturated.

 Snake Plant: If you’re looking for an easy-care houseplant, you can’t do much better than snake plant. This hardy indoor is still popular today — generations of gardeners have called it a favorite — because of how adaptable it is to a wide range of growing conditions. Most snake plant varieties have stiff, upright, sword-like leaves that may be banded or edged in gray, silver, or gold. Snake plant’s architectural nature makes it a natural choice for modern and contemporary interior designs. It’s one of the best houseplants around! Place in low light to full sun and let dry between watering.

Dracaena has bold and architecturally pleasing foliage. The arching flow of these dramatically striped leaves lends a sense of movement to a tabletop or desk. Plants are content in low light, and need only moderate watering and occasional feeding to thrive. A handsome, low-maintenance accent plant for almost any room.

Wandering Jews, also called spiderworts, are valued for the stripes of white, green, silver, and purple colors of their foliage. They have trailing vines that flow from their base and are very easy to care for. Place them in bright indirect light for best foliage color and let them become slightly dry before watering.

Crispy wave fern: due to its uniquely strong fronds, hardiness, and adaptability, crispy wave can outlive almost any other potted plant. If you tend to this low maintenance plant properly, it will keep your air naturally clean for a very long time. Place it in medium to low light and never let it dry out!

Cyclamen Care Guide

  Cyclamen are one of the most beautiful and best winter bloomers. Over the years, growers have come up with many new hybrids for us to enjoy. Some have ruffled flowers, and some varieties are miniature, but all maintain a large bright flower, usually in red, pinks, maroons and white. All Cyclamen display green or variegated heart shaped leaves.

Cyclamen are a great indoor plant – easy 8 weeks plus of color.
One of the reasons our Cyclamen last as long as they do is that we build up the base of the plant first.  Proper variety selection, culture and nutrition will allow the plant to grow a lot of leaves – and with Cyclamen, leaves = flowers.  If you gently push apart the leaves on one of our Cyclamen you will see lots of buds coming up from the center. You can also move a Cyclamen outside in April – the plant will take a freeze, but you should be careful to acclimate the plant so the change isn’t too great, both from a temperature and sunlight perspective.

Cyclamen are actually a type of bulb or more specifically a Corm (a short, thickened vertical stem). Their native habitat is the Mediterranean and Southern Europe. In your home, Cyclamen like to be a little on the cooler side with temperatures around 61˚F and in direct light or bright indirect light.

While in bloom, keep the root ball moist and feed the plant every two weeks. Cyclamen should be kept moist by watering in a tray and allowing the roots to take up the water rather than watering from above the plant which can lead to rotting. Remove yellow leaves and spent flowers.

When cyclamen are done blooming they can be discarded or the corm can be saved. After the foliage dies back, the plant should be left to dry. The corm should then be dug and repotted in midsummer and placed in a warm place so it can establish roots before returning it to a cool 55 – 60˚ F. to encourage flowering.

Light

Give cyclamen bright, indirect light in the winter when they are actively growing. In summer, it is best to keep cyclamen in a cool, dark spot with good air circulation. You can also move it to a shady spot outdoors in summer. Just make certain it is not getting too much water.

Soil

Cyclamen persicum does best when planted in a soilless-based potting mix, with the top of the tuber just slightly above the soil line.

Water

When leaves are present, the plant is actively growing. Water whenever the soil feels dry about an inch below the surface. Avoid getting water on the crown of the plant, which could cause it to rot.

As the flowers begin to fade, gradually allow the plant to dry out for two to three months. It is going into a dormant stage, and any excess water will cause the tuber to rot. If you put it outdoors during dormancy, be sure to turn the pot on its side to keep the rain out. A little water is not harmful, but you don’t want the soil to remain wet.

Temperature and Humidity

Cyclamen do not like extreme heat, drafts, or dry air. They do best in a climate that replicates their native environment, between 50 degrees Fahrenheit and the mid-60s. High humidity, especially during winter, is crucial. Keep the cyclamen on a tray of water with a layer of pebbles or gravel to form a shelf for the cyclamen pot to sit on. Do not let the bottom of the cyclamen pot sit submerged in the water or the roots will rot.

If you moved your plant outdoors for the summer, bring it back indoors before the weather turns cold. A good rule of thumb is to bring it inside while the temperature is still comfortable for you with the windows open.

Fertilizer

Feed your cyclamen plant with a diluted liquid low-nitrogen fertilizer and high in phosphorus every couple of weeks while in full leaf. You do not need to fertilize cyclamen while it is dormant.

Potting and Repotting

Cyclamen should be repotted every two years. You can re-pot while the plant is dormant, in the summer, with fresh soil and a slightly larger pot.

  1. Fill the new container part way with potting soil.
  2. Lift the tuber out of the original pot and brush off the old soil, but don’t rinse it. Place the tuber in the new pot so that its top is about one inch from the rim. Cover it halfway with potting soil.
  3. Place the pot in a shady, dry spot for the rest of the summer. Start watering it around September and you should start to see new growth emerging.

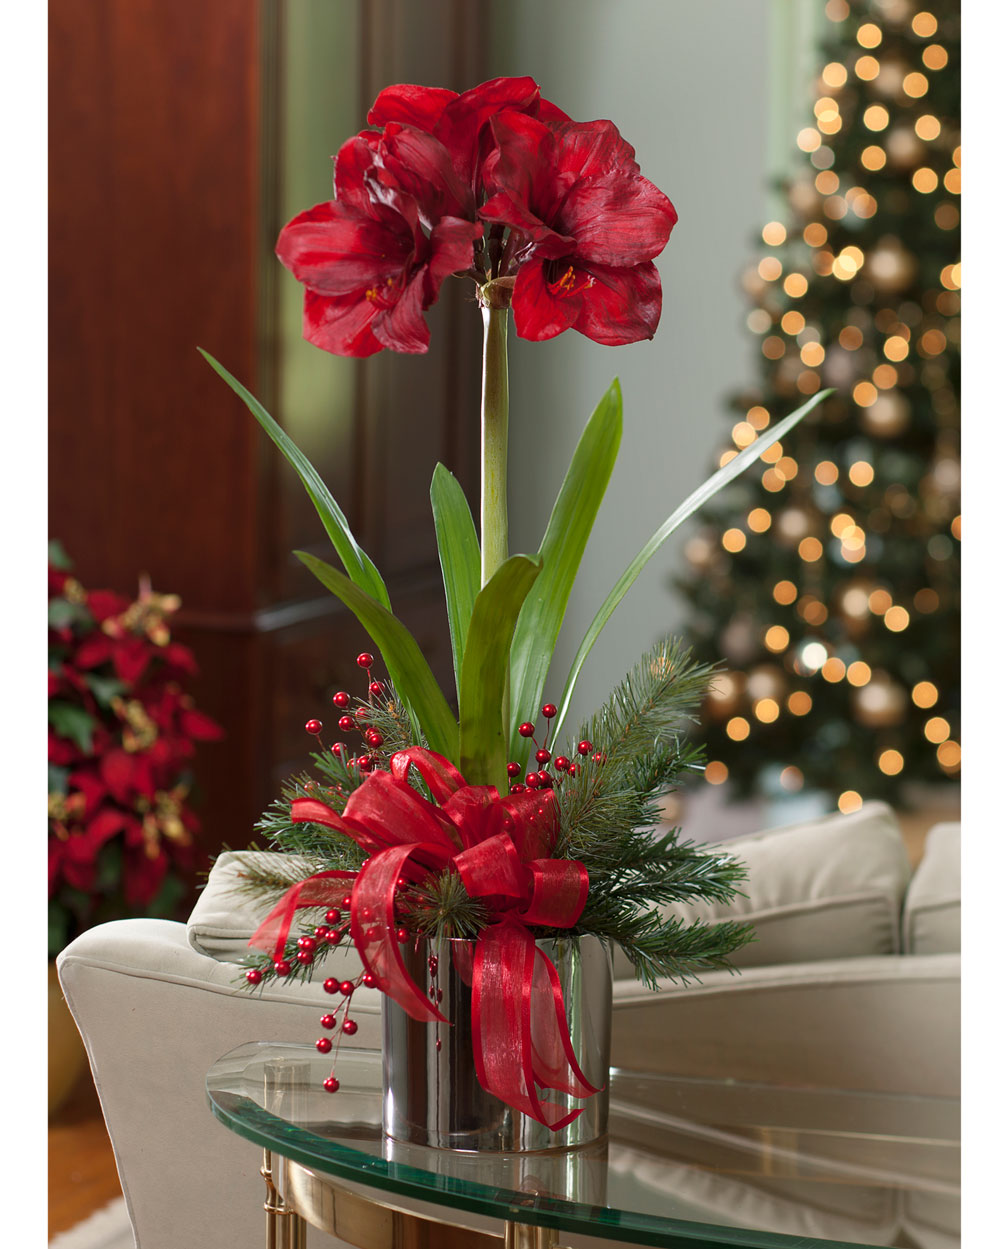
Amaryllis Care Guide

Purchase large bulbs for lots of flowers.

Purchase the biggest amaryllis bulbs you can find. Jumbo, 34/36 cm bulbs will produce 3 stems

with 4 to 5 flowers per stem. Smaller bulbs will give you fewer stems and fewer blossoms.

Keep in mind that some amaryllis varieties naturally produce smaller bulbs than others. Sometimes a 28/30 cm bulb is the largest size available.

Choose several different varieties to extend the show.

There’s no way to know exactly when an amaryllis will flower, but some varieties tend to bloom sooner than others. If you want to have flowers all winter long, purchase a number of different varieties and don’t plant them all at the same time. Plant some bulbs in late fall and plant the rest in early winter.

After planting, be patient. It usually takes a month or two for the bulbs to wake up and begin growing.

Select the right pot and use good soil.

Amaryllis have long stems and big flowers. A heavy pot with a wide base will help the plant stay upright. Choose a pot that is about 2” wider than the bulb. If you are planting several bulbs in one container they can be planted about an inch apart.

Use a high-quality, sterile growing mix (to avoid fungus gnats). Moisten the soil, fill the pot a little more than half full and set the bulb on top. Add more soil, leaving the top 1/3 of the bulb exposed.

Water sparingly.

After you plant your bulbs, water well to help settle them into their pots. Then keep the soil barely moist, applying no more than ¼ cup of water per week. For best results, grow your amaryllis in a relatively cool room (60-65°F) with bright, indirect light.

The first thing to emerge from the bulb is usually a bud. Leaves and additional stems will follow. Rotating the pot every few days will help keep the stems straight.

Make the most of the flowers.

Depending on the size of the bulb, you can expect 1 to 3 stems, each with 3 to 5 flowers. All of the stems may come out at once, or they may emerge over a period of 2 to 3 weeks.

As with all fresh flowers, cool temperatures will extend their life. Amaryllis also make excellent cut flowers. Cut the stems right before the buds are ready to open, and display them in a vase with greens or other seasonal blooms.

Use scissors to clip off faded blossoms. Once the stem has finished blooming, use a knife to to make a clean cut about 1″ above the bulb.

Keep or toss the bulbs.

An amaryllis bulb costs no more than a supermarket bouquet. Yet many people find it hard to part with the bulb once the flowering season is over. If you wish, you can save the bulb and try getting it to bloom again next year. To learn more, read How to Get an Amarylllis Bulb to Rebloom.

Get an Amaryllis to Rebloom

Remove the Flowers and Stalks. Snip off the flowers as they fade and cut the stems to within an inch the bulb. If the bulb was grown in water rather than soil, plant it in a pot with a drainage hole. There should be at least 1” of space on all sides and room for the roots underneath. The top of the bulb should be above the soil surface.

Give It Sun. After the bulb flowers, it will produce several long, strappy leaves. As with other flower bulbs, amaryllis use their leaves to produce energy for next year’s flowers. Give the plant plenty of bright light to help it build up its reserves. Grow your amaryllis indoors during winter and spring. After danger of frost, you can move it outside for the summer.

Feed and Don’t Overwater. Fertilize the plant once or twice a month to keep the leaves lush and green. The bulb should stay dry and the soil should be barely moist — never soggy. If your summers are wet, you may need to shield the pot from rain.

Let It Rest. In late summer or early fall, stop watering and move the potted bulb to a cool (55°F), dry location, away from bright light. A basement or garage is ideal. The leaves will gradually wither and fall away as the plant goes dormant. Leave the bulb alone and don’t water it.

Repot for a Second Appearance. After your amaryllis has rested for 2 to 5 months, you can start again. There’s no rush, so if you have several bulbs you may want to start them at different times. Repot the bulb using fresh growing mix. Water once and move the pot into a bright, 60-65°F room. Water sparingly until the bulb is in active growth.

Planting Tulips and Caring for them

HOW TO PLANT TULIPS

When to Plant: Tulip bulbs should be planted in mid to late fall, any time after the first frost and before the ground freezes. For best results, plant the bulbs within a month after you receive them.

Depth and Spacing: Plant tulip bulbs 6″ to 8″ deep and 4″ to 5″ apart on center. You may plant the bulbs individually, or can dig out a larger area and plant a number of bulbs at once. Position the bulbs with the pointy end up and then cover them with soil. Fall and winter rains usually provide adequate moisture. Water only if the weather is very dry.

Planting Tips: Planting tulips side by side in a single row looks stiff and unnatural. For best results, plant informal groups of 7 or more bulbs. Rectangular, triangular or oval patterns will make the planting look as full as possible and ensure the flowers are visible from all angles.

CARING FOR TULIPS AFTER THEY FLOWER

Will your tulips come back to bloom again next year? This depends on the type of tulip you planted and the growing conditions in your garden. If the bulbs do produce a second year of flowers, you can expect the blossoms to be smaller and fewer in number. The best way to guarantee an impressive display of tulips every spring is to plant fresh bulbs each fall.

If you treat your tulips as annuals, you can simply remove the entire plant, bulb and all, as soon as the flowers have faded. You can also feel free to cut your tulips for arrangements and enjoy nice long stems with plenty of foliage. Best of all, you get to try new colors and styles, and compose your own unique color combinations every year.

If you want to try getting your tulips to rebloom, here are some tips:

• Darwin hybrids, Emperors and species tulips are less prone to splitting and more likely to rebloom in future years.
• Plant your tulip bulbs in a sunny spot with very well drained soil. Excess moisture encourages splitting.
• Once the bulbs have finished blooming, immediately remove the spent flowers, cutting about 1” below the bloom.
• Allow the stem and foliage to continue growing and producing energy for next year’s flowers. When the foliage has turned yellow, remove it with a gentle tug or cut it back to the ground.


All about Daffodils

Daffodils, also known by their botanical name narcissus, are easy and reliable spring-flowering bulbs. They multiply quickly and return to bloom again each spring, year after year. They are not fussy about soil, will grow in sun or part shade and are not bothered by deer, rabbits and other pesky critters.

PLAN FOR SUCCESS

Sun or Shade: Daffodils will grow in full sun or partial shade.

Hardiness Zone: Daffodils are winter hardy in growing zones 3-8 and will return to bloom again year after year.

Soil Conditions: Daffodils are not fussy about soil. They are happy to grow almost anywhere as long as the soil is not soggy.

WHERE TO PLANT DAFFODILS

Front Yards and Entryways: Planting daffodils in front of your house will let you and your neighbors enjoy a wave of welcoming spring color for years to come. To extend the flowering season, choose varieties with complementary bloom times. If you’d like achieve a relatively formal look, plant in blocks, keeping each variety separate. Combining a number of different flower shapes and colors will give you a more casual, naturalistic effect.

Perennial Gardens:  Daffodils come into bloom long before most perennials. Planting daffodils in your flower beds will ensure you have flowers as soon as the weather begins to warm up. Miniature daffodils are a good choice for flower gardens as their leaves are narrower and won’t get in the way of newly emerging perennials.

Containers and Window Boxes: Daffodils are traditionally planted in yards and gardens, but they also grow well in containers. This makes it easy to add instant spring charm to porches, patios or small urban gardens. In zones 6 and colder, potted bulbs need winter protection to keep the soil from freezing.

Cut Flower Gardens: Celebrate the color and fragrance of spring with bouquets of daffodils that can be enjoyed indoors or be shared with friends and family. Planting daffodils in a cutting garden will ensure you always have plenty of blossoms to cut.

Naturalizing: Daffodils are ideal for naturalizing in meadows, wooded areas or near ponds and streams. They come back reliably every year and are not bothered by deer or rodents.One of the best varieties is ‘Ice Follies’.

 

Amaryllis Tips

If you buy a loose bulb, you can get excellent results

by choosing the largest bulb.  These bulbs will produce a large number
of flowers and additional stalks for a longer season of bloom.


Use a pot only 2 inches wider than the bulb itself, because amaryllis

do best when they are comfortably pot-bound.  A standard soil mix works

well for them.  First, cut off any dead or unhealthy roots emerging from

the base of the bulb, leaving only those that look strong and are firm.

Fill  the pot  half full of soil mix, set bulb on it, and add enough soil so that

nearly half of the bulb will be above the surface of the soil.  Place pot in

a room where it gets half to full sunlight a day.  Water it thoroughly after

planting and about once a week thereafter, or more often if the soil is dry.

Rotate the pot occasionally so the stalk will grow straight.

Once the blooms are open if you want to lengthen the bloom time

it is best to keep the plant out of direct sunlight and in a cool location.

It is not unusual for the leaves to grow after, during or before the bulb has bloomed.


Saving the Amaryllis Bulbs from Year to Year

It is necessary to rebuild the bulbs energy if you want it to produce flowers

the following year.  After the blooms have faded, cut off these finished flower stalks

but leave the foliage on the bulb.  Place the pot back in a room where it gets

half to full sunlight a day.  Use a liquid fertilizer once a month or add Osmocote

on top of the soil for a slow time release fertilizer.  Continue to water

the plant once a week or as needed.  The leaves should stay green and continue

to grow while re-energizing the bulb through the summer.  You can also place the pot outside for the summer under a shade tree.  Continue to water and fertilize.

At the end of summer when the kids go back to school, stop watering the bulb.  When the soil is dry, cut off the leaves and store the bulb in a cool dark location.

The bulb needs 8 weeks of rest.  Then it can be brought out.

Repot the bulb using fresh soil.  The cycle begins again!


Growing Paperwhites

Enjoy Paperwhites Indoors
Paperwhites will remain beautiful throughout the holidays and beyond, making them great gifts for friends and family (and, of course, schoolteachers). Paperwhites are easy to force into bloom indoors. The bulbs do NOT need to be placed in cold storage to bloom. Paperwhite bulbs begin to grow as soon as they are planted, with fragrant flowers appearing in 4-6 weeks.

Each tall flower stem produces several small, snowy-white flowers. Make your flowers last longer by keeping the plant in a cool location. Blooms will look fresh for 3-4 weeks if kept at a maximum of 65°F/18°C.

When purchasing paperwhites choose bulbs that are firm, not soft or mushy. There are a couple popular varieties I recommend: ‘Ziva’ is a prolific bloomer… and ‘Erlicheer’ is a multi flowering double daffodil with white petals and creamy yellow centers. Brighten your home in the winter months by pairing Paperwhites with Amaryllis bulbs.

Steps to Forcing Paperwhites in Soil

  1. Plant paperwhite bulbs in a shallow pot filled with potting mix. Set as many bulbs as will fit in the pot, as close together as possible without touching. Top with potting mix, leaving the tips of the bulbs exposed.
  2. Water thoroughly to moisten the soil.
  3. Place in a cool (50-60°F/10-24°C) low-light location until shoots appear, usually in 2-3 weeks. Then move pot into warmer temperatures and a brighter location, but out of direct sun. Turn the pot once in a while so that all the stems get equal light. They’re fast growers, with blossoms appearing in 4-6 weeks from time of planting.

How to Grow Paperwhites in Pebbles

  1. Cover the bottom of a shallow container with pebbles (or glass marbles) about 2-3 inches deep. Set the paperwhite bulbs on the pebbles with their tips pointed up. Cover the bulbs with more pebbles, leaving their tips exposed.
  2. Add just enough water to reach the bottoms of the bulbs.
  3. Set them in a cool location and give them the same care as described in #3 above.

Paperwhite Tips                                                                                           Indoors, you may need to stake your paperwhites at some point. These flowers can get leggy with insufficient light. Stake with bamboo or cut branches from your garden. American sweet gum (Liquidambar styraciflua) creates a rustic look, and redtwig dogwood (Cornus sericea) offers bold, Christmas-red stems. Use willow (Salix sp.) after New Year’s, as the yellow-green stems help warm up the winter months.

Keeping Paperwhites Short with Alcohol

When paperwhite bulbs are grown in a dilute solution of alcohol, the plants reach a height of 1/3 to ½ their normally expected growth – but the flowers remain normal size and last just as long. Why they thought of giving their paperwhites a nip remains a mystery, but it appears that the resulting water stress on the plants is just enough to stunt their growth, but not interfere otherwise.

  • The alcohol content needs to be less than 10%, or your plants will overdose and severe growth problems will occur. Check the bottle for the percentage alcohol. Many liquors are only labeled as “proof”, not percentage of alcohol. Don’t confuse the two. To determine what percentage alcohol you have, divide the proof in half, So and 86 proof bourbon is 43% alcohol.
  • You can use any hard liquor (vodka, tequila, whiskey…) or rubbing alcohol. Don’t use wine or beer because they are too high in sugar.
  • You will have to do some math to get the different concentrations of alcohol down to 4-6%.
  • To convert your booze to 5% alcohol, just divide the percentage alcohol by 5 and then subtract 1. That will tell you how many parts water to mix with your 1 part alcohol. Ex: 40 divided by 5 = 8: 8 minus 1 = 7… 7 parts water to 1 part alcohol.

10% Alcohol = 1 Part Water to 1 Part Alcohol
15% Alcohol = 2 Parts Water to 1 Part Alcohol
20% Alcohol = 3 Parts Water to 1 Part Alcohol
25% Alcohol = 4 Parts Water to 1 Part Alcohol
30% Alcohol = 5 Parts Water to 1 Part Alcohol
35% Alcohol = 6 Parts Water to 1 Part Alcohol
40% Alcohol = 7 Parts Water to 1 Part Alcohol

Paperwhite Bloom Calendar

Planted Week of                                Blooms week of

November 5 ………………………… December 17

November 12…………………………December 24

November 19…………………………December 31

November 26…………………………January 7

December 3………………………….January 14

December 10…………………………January 21

December 17………………………..January 28