Author Archives: D.R. Snell Nursery

Succulent Container Garden

Have you noticed how a container garden can really jazz up a front entryway, back deck or porch? Perhaps you’ve thought twice about including this addition to your plantscaping because you just don’t have time every day to water.

Cheer up! You can plant a container with succulents (plants with fleshy or thickened leaves, stems or roots) and you will not have to worry about watering frequently. Succulent container gardens are relatively carefree, and they’re so easy that you don’t have to limit yourself to just one. If one container makes a statement, several will create a conversation!

Succulent Container Garden Tips and Tricks

To have the greatest success with your new succulent container garden, consider…

  • Exposure
    Full sun is a must for all succulents and will help show off their subtle colors and textures. If your viewing location has less than adequate sun, place your succulent garden in a full sun area for the majority of the day and move to your desired location when you have company or time to enjoy it yourself. Remember to move it back out into the sun when company leaves.
  • Containers
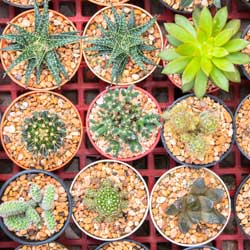
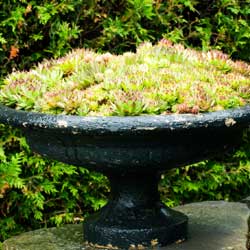
    Because succulents do not have extensive root systems, your chosen containers may be shallow. Too much soil can hold excessive water causing the succulent’s roots to rot. Perhaps a strawberry pot would make the perfect focal point at your front door, and many front doors look great with a single shallow round planter sitting on the stoop. If you have several steps to the door, try a pot on each step. How do you want your front entrance to say “hello”?
  • Height
    Think about varying the heights of your containers. Perhaps your containers will require a pedestal or something else for elevation. This could be an inverted pot, a table, shelf or even pot feet. You may even consider hanging your container for elevated elegance. Whatever you choose, it’s important to remember succulents require excellent drainage. Therefore, the containers must have holes.
  • Soil
    All succulents need fast draining soil. Pre-mixed soil is available that is specifically blended for succulent container plantings. You may also use a general all-purpose potting mix and add perlite, coir or sand to increase the drainage sufficiently.

Plants for Your Succulent Container Garden

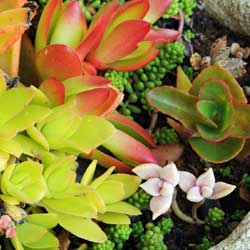
When making your plant selection, it is fun to let your imagination go wild and embrace the full range of amazing succulents available. As a good container gardening rule of thumb, Use a thriller (something stunning to catch the eye), a filler (a sturdy, reliable choice to fill in bare spots) and a spiller (a trailing plant to blur the container edges) and you’ll never go wrong.

Succulents come in an extensive variety of colors, striking shapes and varying sizes. As when planting any container, evaluate plant color, texture and shape when making your selections. You may feel overwhelmed when choosing your plants. If you can’t decide, here is a simple “recipe” for planting one 16″ container to be seen from all sides. Maybe it will give you some ideas:

  • 1-thriller (Euphorbia tirucalliSticks on Fire‘) planted in the middle.
  • 3-fillers (Kalanchoe blossfeldiana) to surround the thriller and provide texture or color contrast
  • 5-spillers (Sempervivum arachnoideum) to drape over the container’s edge.

As an extra bonus, many succulents bloom, adding extra unexpected beauty. Blooms can be few and far between, however, but they will be exciting and rewarding when they are spotted.

The Importance of Topdressing

After planting, gently brush off any residual soil from the succulents’ leaves. Add more interest by topdressing the container. This is a layer of material will give your container garden a finished appearance. Desert type plants look great with a thin layer of light tan-colored gravel or red lava rocks. Create sparkle with sea-glass toppings or add a clean, contemporary look to Zen-like or Asian inspired plantings with smooth black river stones. Other popular top dressings include glass marbles, colored aquarium gravel or tiny seashells. You might even add a fairy garden surprise in the container, such as a miniature hut, hidden gnome or other quaint character who will call your succulent garden home.

Most importantly, have fun!

succulent-2succulent-3

succulent-1

General Soil Amendments

We’ve all heard of the importance of amending the soil properly for gardening and landscaping, but the number of soil amendments sold in garden centers often confuses gardeners. Which is which, and which will work best for your soil conditioning needs?

Types of Soil Amendments

Soil amendments fall into two basic categories, inorganic and organic. Inorganic amendments come from non-living materials such as sand, perlite, vermiculite and crushed stone. With the exception of limestone and gypsum, which are used to increase soil calcium, these are not commonly used in the garden.

However, organic amendments are the opposite. They come from previously living materials such as peat, manures and composts. When leaves, bark, peat, animals and animal wastes are mixed together to decompose, compost or “humus” is the final product. Very commonly used, these materials enrich the soil by increasing the air spaces, adding extra nutrients to the soil, improving the absorption of those nutrients and increasing overall soil fertility.

Why You Need Soil Amendments

Excellent soil is not common around most homes. Even if it was initially, house construction and roadwork often removes the good soil and construction equipment compacts the remaining soil. Furthermore, heavy use of the remaining turf – children and pets playing, for example – continues to compact the soil. Chemical treatments, runoff from gutters and downspouts, removal of existing plants, changes in local wildlife – all of these factors can wreak havoc on soil.

Adding organics loosens compacted soil and results in better gardens. Incorporate organics into the beds throughout the year by working evergreen needles, leaves and lawn clippings into the soil. Amendments such as peat or lime can improve a pH problem, if one exists. Calcium and magnesium deficiencies can be corrected using organic materials such as bone meal or wood ashes, or inorganic materials such as limestone, gypsum or soft rock phosphate.

Mulching is another simple way to add biodegradable materials to the soil. Simply place mulch around the plant, leaving several inches bare closest to the stem to discourage insect invasions and rot. In addition to slowly providing nutrients as it decomposes, mulching is attractive, reduces weeds and erosion, maintains soil temperature and prevents “crusting” that occurs when soil becomes too dry.

Another advantage of adding organics is the attraction of worms. They further assist in the decomposition, increase aeration and leave worm castings, a valuable organic material, behind. A healthy garden is home to many worms, and it all starts with adding organic soil amendments.

Whether you opt for organic or inorganic soil amendments, if you use them properly, you soil will improve and your landscaping, flowerbeds and garden will look better than ever.

Crape Myrtles

No yard or landscape should be without a crape myrtle, or two, or three or… many! How wonderful to have something that blooms so profusely during that time of year when most other plants are looking tired and worn from the summer heat and drought. The versatility of this plant makes it suitable for many types of yards and many uses, and once established, they will go on to add charm and delight to the landscape for many years.

About Crape Myrtles

Crape myrtles bloom in late summer and can be found in flower colors of pinks, lilac, white, reds and purples. Requiring very little maintenance once established, crape myrtles need a full sun location to thrive and they do not like wet feet. Keep these needs in mind when selecting a site to plant them. They will require some supplemental watering for the first year or so to get off to a good start and develop good roots. Crape myrtles are also pretty much pest-free, except for aphids on occasion and these are easily controlled with an insecticidal soap spray. Some varieties are more susceptible to powdery mildew than others but most of the newer varieties are more resistant to this fungus problem.

Planting Crape Myrtles

Although tolerant of a wide range of soil qualities, crape myrtles grow poorly in wet locations so be sure to select a well-drained planting site. Late spring to early summer is the best time to select and plant your new crape myrtles while they are actively growing and can settle in quickly. Plant at or slightly above ground level, spreading the roots out slightly and using mulch to protect and shelter the roots after planting. They do prefer a slightly acid soil.

Crape Myrtle Types

Crape myrtles can be found in shrub, multi-stem tree and single trunk tree forms. For best results select a cultivar whose growth characteristics and ultimate mature size fit your intended use. Planting a shrub- or tree-like crape myrtle in an area of limited space will require yearly pruning to keep it from outgrowing its place. Single- or multi-stemmed tree-form crape myrtles are ideal as flowering specimen trees or as small, flowering shade trees near patios, walkways and entrances. Shrub forms make an excellent accent in a shrub border when planted in groups. Dwarf plants are effective as large groundcovers, perennial bedding plants or container plants providing vivid, summer-flowering interest.

Pruning Crape Myrtles

If adequate room is provided, little pruning is required except to maintain shape or remove any dead or crossing branches. Remove any suckers or water sprouts to maintain tree forms and elegance. Blossoms are produced on new growth so you can prune anytime the plants are dormant through the winter.

With so much to love about these plants, there’s no reason not to add one to your yard this year! And next year, and the year after that, and the year after that…

Save

Growing Grass in the Shade

Cool season turf grasses prefer to grow in the sun. To establish a thick, healthy lawn of Kentucky bluegrass and perennial rye, you will need at least six hours of full sun daily. Fine and tall fescues are more shade-tolerant and require a minimum of four hours of full or eight hours of filtered sun a day. When plants do not receive enough sun, they cannot manufacture food (photosynthesis) effectively to support growth. As a result, plants that do not receive adequate sun are less heat- and cold-tolerant and more susceptible to disease and insect damage. When it is a tree or shrub that is causing the shade, there is also competition for soil nutrients and water. 

What does this mean for those of us with less than optimal light on our lawns? If it is grass that you wish to grow, it is not impossible, but you will have to settle for thinner turf. It doesn’t have to be any less healthy or hardy, however. Your chances of maintaining a healthy, thin lawn in a shady area is increased when adopting the following guidelines: 

  • Increase the amount of light and air circulation, if possible, by thinning tree canopies or removing the trees altogether.
  • Test your soil pH. It should read between 6.0-6.5 for growing fine fescue grasses.
  • If drainage is poor, improve it. Most turf grasses prefer well-drained soil.
  • Use a shady grass seed mixture with a high percentage of fine fescue grasses.
  • Do not sod. Most sod on the market is Kentucky bluegrass, which requires full sun.
  • Sow seed in late August to avoid heat and drought stress, weed competition and suffocation from falling leaves. Early spring is the second best time to seed.
  • During periods of drought, provide deep soakings to encourage a deep root system. Water early in the day to allow leaf blades a chance to dry and therefore reducing the possibility of disease.
  • Mow grass high, 3-4 inches. More leaf surface is required to increase photosynthesis in the shade.
  • Limit foot traffic in shady areas. This grass is already growing under stressful conditions and high use will contribute to its decline.
  • Fescue requires less nitrogen than other grasses. You may allow the grass clippings to stay in place. As they break down they will provide nitrogen to the soil. A spring and fall application of a high phosphorus fertilizer should also be used.

It is highly unlikely that you will have success when attempting to grow lawn in deep or heavy shade. The one exception is Poa trivialis, commonly known as rough bluegrass. This type of lawn is very shade-tolerant, but must have consistently moist soil. Without both heavy shade and constant moisture, you will not be able to grow a rough bluegrass lawn. 

Turf Alternatives 

Alternatives to turf in a shady area include: 

  • Shade-Tolerant Evergreen Ground Covers

Though not quite the same as grass, these groundcovers provide a green landscape without needing plentiful sunlight. They can also be lower maintenance and don’t require mowing. Selections include common periwinkle, pachysandra, purple wintercreeper, English ivy and lilyturf.

  • Perennial / Annual Shade Garden

Why not remove turf entirely in favor of other shade-loving plants? There are plenty of stunning perennials and annuals that don’t mind a bit of darkness. Visit our garden center and speak with our knowledgeable staff. We have an extensive selection of shade plants available and can help you make choices that will best suit your landscape conditions.

  • Mulch

Mulch is an excellent turf alternative for shady areas especially under a shallow-rooted tree where it can be difficult to grow anything. Mulch can also help you define paths to walk through the shade garden and will prevent mud from becoming a problem on those paths. You can opt for wood nuggets, shredded bark, gravel, river rock or even artificial mulches in a variety of colors. 

It can be a challenge to grow grass in the shade, but if you choose the proper type of grass and care for it well, you can cultivate shade-loving turf. If you’d rather not fuss with it, there are plenty of amazing alternatives that can make even the darkest corner of your landscape shine more brightly.

dining table with parasol

Watering Tomato Plants

Proper watering plays a significant role in producing a healthy tomato plant with tasty, meaty, juicy fruit. So, what’s the secret, and how can you be sure you are watering your tomatoes the right way?

Watering Location

Always water tomatoes at the root zone; never overhead water your tomato plant. Watering directly at the soil level will strengthen the plant’s root system and ensure the maximum amount of moisture reaches the roots. When you overhead water, much of the water will not make it to the roots as it evaporates before reaching the soil. Water droplets on plant leaves act as a magnifying glass and can burn tender plant tissue, damaging foliage that is essential to keep the plant healthy. Water dripping from leaf to leaf can also spread disease, infecting an entire crop. To be sure tomatoes are not being watered inappropriately, keep plants out of reach of lawn sprinkler systems or other inadvertent watering.

Watering Speed

Slow watering is essential to properly distribute moisture to a tomato plant. Allow the water to drip slowly into the soil, giving the plant roots time to absorb the moisture. A drip system is best and will also help with water conservation. Avoid using a hand held hose, as it is easy to either underwater or overwater using this method. Water to a depth of 8 inches to ensure all roots have access to adequate moisture. You can also use a watering reservoir, such as a gallon jug with several small holes in its bottom, to slowly and carefully water the plants without flooding the root zone.

Watering Frequency

A regular watering schedule is essential for the healthiest, most productive tomato plants. Water consistently to produce larger fruits and to avoid split and cracked fruit and blossom end rot. Tomato plants should be watered 2-3 times a week in the height of summer or when natural rain is lacking. A deep soaking rain counts and supplemental watering should be adjusted whenever Mother Nature lends a hand with watering chores. The top inch or two of soil should dry out between watering to be sure the plant is not getting too much moisture.

Watering Adjustments

There are several times when it may be necessary to adjust where, when and how much you water your tomatoes. Changes in local rainfall – increasing spring or summer rains, a sudden storm, an unexpected drought – can require changes in supplemental watering to keep the moisture to your tomatoes consistent. As plants grow and more fruit appears, more water may be needed to meet the plant’s watering needs and keep it lush and healthy.

By understanding the basics of watering tomatoes, you can keep your plants well hydrated without risk of either overwatering or underwatering, both of which could be disastrous for your tomato crop.

WaterTomato

Fungus Gnats

Have you noticed little black gnats flying around your houseplants or outdoor potted plants? These are probably fungus gnats. These can be a serious problem in commercial greenhouses holding thousands of plants but are easily controlled by homeowners who take appropriate steps for eliminating these pests.

What Fungus Gnats Need

As weak fliers, fungus gnats live in and around damp decaying material. Plants with fungus gnats are usually being overwatered. This is the primary cause for an increase in the gnat population, as they thrive in wet, organically-rich soil. Gnat grubs nibble on the tender roots of houseplants, but they do not generally do enough damage to severely harm the plant – they are more of a nuisance as they mature and fly around the plant. These gnats do not bite, but they can be annoying. When an infestation is bad, they can quickly spread from plant to plant, making them even more challenging to control.

Ways to Control Fungus Gnats

Letting a plant dry out between watering will decrease the decay and fungus in the soil, making the pot less hospitable for fungus gnats. Always make sure pots have adequate drainage and that water is not left standing in saucers. Adding a porous top-dressing, such as sand or gravel, to the pot can also help water drain away from the surface so the gnats cannot burrow down to the organic richness they crave.

For home use, insecticidal sprays with Pyrethrins are available and can be used against fungus gnats. If treating a houseplant, be sure to take plants outside and follow label instructions carefully, keeping the chemical away from children and pets at all times. Bacillus thuringiensis (BT), a biological control, will also provide relatively fast control killing the larvae in the soil.

For houseplants, the easiest and fastest remedy is often the best. Repot the infested plant using new potting soil into a pot with drainage. Carefully rinse the plant’s roots while repotting to remove as much soil as possible, and be sure the new pot’s hole is not clogged. Prune away any dead roots, leaves and stems. The gnats will be gone immediately.

To keep fungus gnats from returning, carefully check a plant’s moisture before watering to prevent moisture problems that can bring fungus gnats back in a flash. Water monitors can be used, or simply check that the top 2-3 inches of soil is dry before watering. Using watering bulbs or other waterers that are inserted deeply into the soil can also keep fungus gnats at bay by providing water directly to the plant’s roots, without saturating the entire pot.

Fungus gnats certainly aren’t fun when they infest your plants, but fortunately there are many ways to keep these bugs under control or eliminate them entirely. Using several techniques at once will be most effective, and the gnats will be gone just as fast as they first appeared.

Heavenly Hosta

Hostas are amazing plants, truly glorious with heavenly foliage that is stunning as a specimen or in mass plantings. The thin spikes of purple or white, trumpet shaped flowers appear for several weeks in the summer and are an added benefit to this divine perennial. But how much do you know about hostas, and which can you add to your landscape?

Phenomenal Foliage

Hostas are praised by many for their magnificent variety of leaf sizes, colors and textures. These angels will grace your garden with heart-shaped, lance-shaped, oval or nearly round leaves, and leaf sizes vary as well. Smooth, quilted or puckered textures, with either a matte or glossy sheen, add to the glory and hostas’ radiant glow.

The leaf margins can be either smooth or wavy and range in color from light to dark green. Foliage colors also include chartreuse, gray and blue, depending on the cultivar. Variegated hostas with cream, white or yellow margins will radiate in a dark area of your garden.

Where to Plant Hostas

While most hostas are shade worshippers, some types will tolerate sun, depending on the overall climate and moisture levels. Hostas remain attractive from spring until frost and can withstand a wide range of growing conditions.

As choice groundcovers or single specimens in the landscape, hostas are certainly divine. Some hostas are quite unusual and rare and may increase in value each year, especially as the plants thrive and can be divided and transplanted with ease.

Best Hosta Care

Little maintenance is required to care for hostas. Cut off old flower stalks after flowers have faded. Divide plants occasionally to increase their quantity. Keep an eye out for pests, especially slugs and snails that munch on the foliage.

Types of Hostas

With so many selections and varieties, you can find a hosta the will fit into almost any garden situation. The most popular options include…

  • Dwarf & Small Hostas: In addition to being planted in secret little pockets throughout your garden or next to paths, dwarf and small hostas can be used in difficult places. Plant them among tree roots, on a slope or terrace or in rocky places containing little soil.
  • Edger Hostas: These hostas are 12” or less in height and have more horizontal growth. They are able to control weeds as they leave no light, when well established, or room for weeds to grow.
  • Groundcover Hostas: This group of hostas grows to 18” or less in height. They do a great job in areas difficult to weed or maintain. If you are in need of a hosta for use as a groundcover, keep in mind it works great to plant spring-flowering bulbs among them. The hosta comes up after the show of flowers and covers the fading foliage of the bulbs.
  • Background Hostas: Selections from this group grow to 24” or taller at maturity. They can be used to increase privacy where you sit and relax or to provide definition to your property line as a unique hedge.
  • Specimen Hostas: Specimens may be any size. Choose a site close to where the plant will be viewed so that every detail (texture, color pattern, buds, flowers and fragrance) may be enjoyed.

Not sure which hosta is right for you? Come in today and let our landscape and garden experts help you choose the right heavenly hosta to add a bit of the divine to your yard!

hosta_1

hosta_2

hosta_3

hosta_4

Rose Care Basics

Beginners often become confused with the many recommendations and suggestions for growing roses. However, it is important to start with the basic guidelines for successful rose growing. Roses can thrive under many conditions, but they are sure to grow better, with more luxurious blooms and fewer problems, when you follow the basics. 

Prepare the Soil 

The proper soil is essential to nourish roses so they can grow to their full potential. To make the soil ideal for roses… 

  1. Take a soil sample to test the pH, either with a home testing kit or through your local extension service. Roses like a pH of 6.0 to 6.8. You may need to add lime to raise the pH or sulfur to lower it to the optimum rose range.
  2. Incorporate composted cow manure or other healthy compost into the soil. This will provide superior drainage and excellent organic material for roses to absorb.

Planting Roses

If they aren’t planted properly, roses won’t thrive as well as they could. Improper planting could even damage roots and destroy a rose bush. 

  1. Select a sunny spot with good soil drainage – roses require at least 6 hours of full sun daily. Early morning sun is preferred because it dries the leaves, which helps prevent disease.
  2. Dig a wide, shallow hole that is 2-3 times as wide but not quite as deep as the root ball (about 1 inch shallower). The plant should sit on solid ground so it doesn’t sink when the soil settles.
  3. Remove the plant from the pot and loosen any circling roots. If you can’t pull the roots apart, use a knife to make 4-5 vertical cuts in the root ball. This will allow new roots to grow out into the surrounding soil as the plant becomes established.
  4. Place the plant in the hole slightly elevated above ground level. Backfill with soil until the hole is half full.
  5. Soak the root ball with a mixture of a Root Stimulator & Transplanting Solution.
  6. Fill the rest of the hole with soil and water thoroughly. Apply mulch to a depth of 2 inches, being careful not to mound mulch against the trunk of the plant, which could encourage rotting or insect damage.

Pruning Roses 

To look their best, roses must be properly pruned. This can be intimidating for rose-growing novices, but once the basics are mastered, the techniques for pruning roses are not difficult. 

  1. In spring, remove winter mulch when new grow appears. Prune out all dead wood and twiggy growth and cut back to sound wood with a clean slanting cut, just above a good bud eye.
  2. During the growing season, remove fading roses promptly, cutting just above a five-leaflet leaf. This will help encourage reblooming on many cultivars, and will help prevent rot or disease infestation.
  3. To winterize, remove all fallen leaves and debris from the base of the plant, cut back to 10-12 inches after the ground freezes, then apply a mound of mulch over the canes to protect them from temperature shock. 

Food and Water 

Roses need the proper nutrition – water and fertilizer – to bloom well and develop stunning colors and fragrances. 

  1. Roses thrive best when given 1 inch of water weekly. A thorough soaking from rain or hose will keep roses blooming all season. Try not to overhead water unless it is early in the day, as the damp leaves can promote disease.
  2. Fertilize monthly with Espoma Rose-tone or similar products specially formulated for the nutritional needs of roses.

Treat for Disease and Pests 

There are times when roses will succumb to diseases and pests. Quickly recognizing these problems and treating them properly will help minimize outbreaks that can damage several rose plants at once. 

  1. Fungus diseases cannot be cured, so a regular spraying schedule is very important. Keep an eye on plants that were infected last year and spray with a fungicide to prevent outbreaks this year.
  2. You may also need to use an insecticide for severe insect problems. Minor problems can be handled with less harsh methods, but diligence will be necessary to keep pests from taking over the rose bushes.
  3. Many rose lovers find it convenient to use an all-purpose insect and disease spray once a week or a systemic control every 6 weeks.

It may seem like a lot of work to cultivate roses, but when you wander through your rose garden or see your favorite rose bush in full bloom, that effort will be well rewarded.

Spraying the roses

rose new budding

Garden Fence, Pink Roses

New Shrub Raspberries

Rejoice! You no longer need hedgerows, trellises or complicated stakes to grow succulent raspberries. You won’t need armor-like gloves either. Now you may grow thornless raspberries in your garden or in containers on your patio, deck or front porch.

Introducing Raspberry Shortcake™

Developed in Oregon after decades of intense breeding for the most desirable plant characteristics, Raspberry Shortcake™ (Rubus idaeus ‘NR7’) is the first truly dwarf raspberry. Growing just 2 ½ to 3 feet tall with a compact, mounding shape, it is covered with full-sized sweet raspberries from mid-summer through fall. Deciduous in the winter, it produces new canes in the spring to bear even more fruit. It is self-fertile so does not require multiple plants to bear fruit, but its size, appearance and juicy berries are too good to plant just one.

Planting Your Raspberry Shrub

Well-drained, rich soil produces the best and most abundant fruit from these shrubs, and neutral pH (7.0) is preferred. If planting in a container, be sure to use a potting mix especially for containers to ensure adequate nutrition to the plant. If planting in the landscape, choose a location in full sun with moderate room suitable for some spreading, such as bordering a hedge or along a walkway that will help guide the growth and expansion. Water regularly for plump, juicy berries. A well-balanced fertilizer in early spring and summer increases plant vigor and production.

Pruning is simple, just remove the oldest canes after fruiting and enjoy the fruits on the new ones in spring. Avoid trimming away new growth, or you may miss out on future harvests, but any dead canes can easily be pruned away to keep the plant healthy and productive, as older canes will not produce new fruit.

Protecting Your Berries

It is important to note that these berries can be just as irresistible to birds and other backyard wildlife as they are to gardeners of all ages and abilities. To protect the berries so there are some left for you to enjoy, it may be necessary to use netting or other types of covers over the shrubs after the berries first appear in the summer. After the fruiting is finished, the covers can be removed.

Raspberry Shortcake™ is so simple, safe and easy, it doesn’t matter what color your gardening thumb may be, what experience you have harvesting berries or even if you’ve never grown anything to eat before – even young children can grow and harvest these mouth-watering raspberries with ease!

Top 10 Disease-Resistant Crabapples

Crabapple trees in flower are a sight to behold. They are the showstopper trees of spring, and are compact enough to fit in nearly any size, shape or style of landscape. But how will you pick the variety that is best for you?

About Crabapples

The unrivaled spring beauty of these trees can take your breath away, as they frequently bud in one color but the flowers open in another, which can create a glorious variegated effect. To add to their appeal, they perform again in the late summer or fall with a fabulous display of hanging, showy fruit that wildlife loves.

Crabapples are available in a range of flower petal colors that include white, pink, red and all shades in between. Flower forms may be single or semi-double with some varieties being fragrant. Selections may be made for fall fruit size and color, including shades of green, yellow, orange, bronze, red and purple. Crabapple trees are also available in a variety of leaf color, size and growth habit to accommodate a landscape of any style and size.

Crabapple Problems

Although these trees have the potential to be stunningly beautiful, crabapples are subject to a number of serious diseases that can leave them unattractive through most of the growing season. The four main offenders are…

  • Apple Scab: This disease manifests as unsightly dark lesions on the leaves and fruit and will cause premature leaf drop.
  • Cedar-Apple Rust: This blight presents as yellow spots on the upper side of the leaves early in the season, followed by orange rust spots on the underside of the leaves in the late summer. This disease will cause premature leaf drop.
  • Fire Blight: This infection gives new shoots the appearance of being scorched by fire and the fruit will look dark and shriveled.
  • Powdery Mildew: This common disease will cause the leaves to be deformed and give them a white, powdery appearance.

There is, however, good news. You can plant a crabapple today without hesitation, because we carry crabapple selections with an excellent degree of disease resistance. Here is our list of the top 10 stunning crabapples with the best disease resistance. We may not have all of these varieties in our current inventory but we certainly have a great assortment on hand for you to choose from. Stop in today to see which varieties we have available or what other cultivars we may be able to recommend for your exact landscaping needs and preferences.

CrabappleChart

Crabapple_2Crabapple_1