Monthly Archives: March 2025

Gardening for Kids: A Fun and Educational Outdoor Activity

Gardening for Kids: A Fun and Educational Outdoor Activity

Introducing children to gardening is a wonderful way to spark their curiosity about nature, teach responsibility, and enjoy quality family time outdoors. Whether you have a large backyard or just a few pots on a patio, gardening can be an engaging and rewarding experience for kids of all ages. Here’s how to make gardening fun and educational for young green thumbs!


Why Gardening is Great for Kids

1. Hands-On Learning

Gardening helps children learn about plant life cycles, soil health, and even pollinators like bees and butterflies. It’s a great way to introduce basic science concepts in a fun and interactive way.

2. Encourages Healthy Eating

Kids are more likely to eat vegetables they’ve grown themselves! Planting easy-to-grow crops like cherry tomatoes, carrots, and strawberries can encourage them to try new, healthy foods.

3. Builds Responsibility and Patience

Caring for plants teaches kids to be responsible by watering, weeding, and observing growth. It also helps them understand that good things take time to grow.

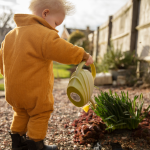
4. Enhances Fine Motor Skills

Digging, planting seeds, and picking flowers help develop hand-eye coordination and fine motor skills, essential for young children’s development.


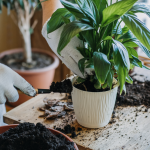
How to Start a Kid-Friendly Garden

1. Choose the Right Spot

Pick a safe and accessible location with plenty of sunlight. Raised garden beds, container gardens, or small garden patches work well for kids.

2. Select Easy-to-Grow Plants

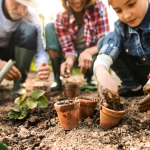
Some plants are more forgiving and sprout quickly, keeping kids engaged. Great options include:

  • Sunflowers – Tall and fun to watch grow.
  • Radishes – Fast-growing and great for beginners.
  • Lettuce – Quick to sprout and easy to harvest.
  • Strawberries – Sweet, rewarding, and fun to pick.

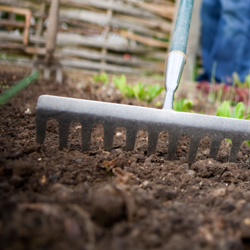
3. Provide Child-Friendly Tools

Equip kids with small, lightweight gardening tools like:

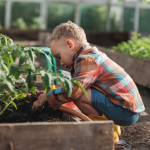
  • A mini shovel and rake
  • A watering can with a gentle spout
  • Gardening gloves

Fun Gardening Activities for Kids

1. Create a Themed Garden

Make gardening more exciting by designing themed gardens, such as:

  • Pizza Garden – Grow basil, tomatoes, and peppers.
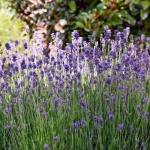
  • Butterfly Garden – Plant milkweed, lavender, and coneflowers.
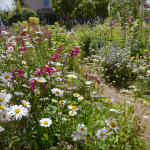
  • Rainbow Garden – Grow colorful flowers and veggies in a rainbow pattern.

2. Start a Seedling Experiment

Use egg cartons or clear cups to start seeds indoors and watch them sprout before transferring them outside.

3. Make a DIY Fairy or Dinosaur Garden

Encourage creativity by adding tiny fairy houses, gnomes or dinosaur figurines among plants for a magical touch.

4. Track Growth with a Garden Journal

Have kids draw pictures or take notes about their plants’ progress, reinforcing observation and writing skills.


Tips for Keeping Kids Engaged in Gardening

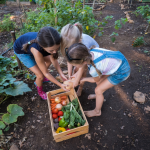
  • Keep tasks short and fun – Young kids have short attention spans, so make activities quick and engaging.
  • Let them get messy – Dirt is part of the fun! Encourage hands-on exploration.
  • Celebrate successes – Even if only one plant grows, praise their effort and curiosity.
  • Incorporate storytelling – Read books about gardening or invent garden-related adventures.

Gardening with kids is not just about growing plants—it’s about growing memories, curiosity, and a love for nature. Get started today and enjoy the journey of discovering the wonders of gardening together!

Spring Ultimate Lawn Care Guide from the Pros

Spring Ultimate Lawn Care Guide from the Pros

As the winter frost melts away, spring is the perfect time to rejuvenate your lawn and set the stage for a lush, healthy yard. With professional-grade tips and best practices, you can ensure your grass gets the strongest possible start for the growing season.


Step 1: Clean Up and Assess Your Lawn

1. Remove Debris

Winter can leave behind dead leaves, branches, and other debris. Rake up any leftover thatch to promote airflow and prevent mold or disease.

2. Check for Snow Mold and Pests

Inspect your lawn for signs of snow mold, dead patches, or pest damage. If you notice grubs, consider applying beneficial nematodes or a grub control treatment.

3. Soil Testing

A professional soil test will reveal pH levels and nutrient deficiencies. If your pH is off, apply lime (to raise pH) or sulfur (to lower pH) accordingly.


Step 2: Aerate and Dethatch for Healthy Roots

1. Core Aeration

Aerating your lawn allows oxygen, water, and nutrients to reach the root zone, promoting stronger, deeper root growth. If your soil is compacted, consider renting a core aerator.

2. Dethatching

If thatch buildup exceeds ½ inch, use a dethatcher or power rake to remove excess material and improve nutrient absorption.


Step 3: Overseed and Repair Bare Patches

1. Choose the Right Grass Seed

For thin or patchy areas, overseed with a high-quality grass seed blend suited to your region and sun exposure.

2. Proper Seeding Techniques

  • Loosen the top layer of soil before spreading seed.
  • Keep the soil moist but not oversaturated.
  • Apply a thin layer of straw mulch (such as EZ Straw) to retain moisture and protect seedlings.

Step 4: Fertilize for Strong Growth

1. Use a Balanced Fertilizer

Apply a slow-release fertilizer like GreenView Lawn Food to promote early-season growth without excessive top growth that can stress roots.

2. Avoid Over-Fertilizing

Too much nitrogen can lead to rapid blade growth at the expense of root development. Stick to professional recommendations for your grass type.


Step 5: Weed Prevention and Control

1. Apply Pre-Emergent Herbicide

A pre-emergent weed control product will stop common spring weeds like crabgrass before they sprout.

2. Spot-Treat Existing Weeds

For already-emerged weeds, use a selective herbicide that targets weeds without harming your grass.


Step 6: Mowing and Watering Strategies

1. First Mow of the Season

  • Set your mower blade to 3–4 inches to encourage deep root growth.
  • Never remove more than ⅓ of the grass blade height in a single mowing session.

2. Watering Best Practices

  • Water deeply 1–1.5 inches per week, ideally in the early morning.
  • Avoid shallow, frequent watering, which encourages weak, surface-level roots.

Step 7: Mulching and Edging for a Polished Look

1. Refresh Mulch Beds

Apply a fresh layer of mulch around trees and flower beds to retain moisture and suppress weeds.

2. Define Lawn Edges

Use a half-moon edger or trimmer to create clean, sharp lawn edges along walkways and beds.


Spring Lawn Care Pro Tips

  • Monitor Your Lawn Weekly: Check for signs of pests, disease, or nutrient deficiencies.
  • Rotate Mowing Patterns: Change mowing direction each time to avoid soil compaction.
  • Invest in Quality Products: Using professional-grade fertilizers, weed control, and aeration tools will make a noticeable difference in lawn health.

By following these pro tips, you’ll set up your lawn for a season of strong, healthy growth. Need expert advice or premium lawn care products? Visit D.R. Snell Nursery for everything you need to achieve the ultimate spring lawn!

Top 6 Flowering Shrubs That Will Transform Your Landscape This Spring

Top 6 Flowering Shrubs That Will Transform Your Landscape This Spring

As the days grow longer and the earth awakens from winter’s chill, there’s no better time to refresh your landscape with flowering shrubs that bring vibrant color, fragrance, and seasonal charm. Whether you’re looking for a bold burst of yellow, delicate spring fragrance, or continuous blooms, these six must-have shrubs will elevate your garden and make your outdoor space shine.

At D.R. Snell Nursery, we’ve carefully selected the best spring-flowering shrubs that thrive in Maryland’s Zone 6 & 7 climate. These beauties will add structure, seasonal interest, and curb appeal—all while being easy to grow.

Let’s explore the top six flowering shrubs to plant this season!

1. Forsythia – A Golden Welcome to Spring

Few plants signal the arrival of spring as boldly as Forsythia. This fast-growing, deciduous shrub erupts in bright yellow flowers along its arching branches in early spring, often before its leaves appear.

🌼 Why You’ll Love It:

  • One of the first plants to bloom in spring—a true sign of warmer days ahead!
  • Low-maintenance and adaptable to most soil types.
  • Attracts pollinators like bees emerging from winter dormancy.

🌱 Planting Tip: Forsythia thrives in full sun to partial shade and prefers well-drained soil. Prune lightly after blooming to maintain shape and encourage new growth.

📍 Find fresh Forsythia plants now at D.R. Snell Nursery!

2. Andromeda (Pieris japonica) – Early Spring Elegance

If you’re looking for a shrub that brings grace and fragrance to your landscape, Andromeda (Pieris japonica) is a perfect choice. This evergreen beauty produces cascading clusters of delicate white or pink flowers in early spring, with glossy green foliage that looks great year-round.

🌸 Why You’ll Love It:

  • Beautiful, bell-shaped flowers bloom in early spring.
  • Evergreen foliage provides four-season interest.
  • Deer-resistant and pollinator-friendly.

🌱 Planting Tip: Andromeda prefers part shade and acidic, well-draining soil. Add peat moss or compost when planting to help maintain soil acidity.

📍 Stop by D.R. Snell Nursery to pick up your own Andromeda shrub today!

3. Flowering Quince – A Burst of Spring Color

Flowering quince (Chaenomeles) is an underrated spring gem, boasting stunning red, WHpink, or coral blossoms in early spring, even before its leaves emerge. This hardy, thorny shrub also produces small, apple-like fruit that can be used for jellies.

🔥 Why You’ll Love It:

  • One of the first shrubs to bloom, with vibrant red, pink, or orange flowers.
  • Drought-tolerant and nearly indestructible—perfect for low-maintenance gardens.
  • Attracts early-season pollinators and adds a unique texture to landscapes.

🌱 Planting Tip: Quince thrives in full sun and well-drained soil. Once established, it requires minimal care and is highly drought-tolerant.

📍 Visit D.R. Snell Nursery to grab this stunning, easy-care spring bloomer!

4. Reblooming Azaleas – Spring & Beyond

Why settle for just one season of blooms when you can enjoy azaleas that rebloom from spring to fall? Reblooming azaleas, like the Encore® series, provide lush, vibrant flowers multiple times a year, making them an excellent choice for continuous color.

💖 Why You’ll Love It:

  • Gorgeous, trumpet-shaped blooms in shades of pink, red, white, or purple.
  • Reblooms in spring, summer, and fall—long-lasting color for your landscape.
  • Compact varieties are great for foundation plantings or container gardens.

🌱 Planting Tip: Azaleas prefer part shade and acidic soil. Use an acidic fertilizer to keep them thriving and producing repeat blooms.

📍 Find stunning reblooming azaleas at D.R. Snell Nursery this spring!

5. Dwarf Fothergilla – A Showstopper for Every Season

Dwarf fothergilla (Fothergilla gardenii) is a multi-season superstar. In early spring, it bursts with fragrant, white bottlebrush flowers, followed by lush green foliage in summer, and spectacular orange, red, and yellow fall color.

🍁 Why You’ll Love It:

  • Fragrant white flowers attract pollinators in early spring.
  • Incredible fall foliage—one of the best for autumn color!
  • Dwarf variety is perfect for smaller gardens and borders.

🌱 Planting Tip: Fothergilla thrives in full sun to partial shade and loves moist, acidic soil. It pairs beautifully with azaleas and rhododendrons.

6. Spring-Blooming Camellias – Elegance That Lasts

Spring-blooming camellias (Camellia japonica) bring timeless beauty to the garden with their lush, rose-like blooms and glossy evergreen foliage. As winter fades, these stunning flowers burst open in shades of pink, red, and white, adding elegance and charm to the landscape.

🌸 Why You’ll Love It:
✔ Gorgeous early-season blooms when little else is flowering.
✔ Evergreen foliage provides year-round interest and structure.
✔ Attracts pollinators and adds a touch of romance to any garden.

🌱 Planting Tip: Camellias thrive in partial shade with well-draining, acidic soil. Mulch well to retain moisture and protect roots from temperature swings. Pair them with azaleas, ferns, or hydrangeas for a stunning layered look!

Bonus: Viburnum – The Ultimate Four-Season Shrub

No spring garden is complete without viburnum, a versatile, hardy shrub that offers clusters of fragrant flowers in spring, lush green foliage in summer, berries in fall, and striking winter interest. With so many varieties available, there’s a viburnum for every garden style!

🌿 Why You’ll Love It:

  • Fragrant spring blooms in shades of white or pink.
  • Attracts birds with its colorful fall berries.
  • Some varieties have stunning red and burgundy fall foliage.

🌱 Planting Tip: Viburnums thrive in full sun to partial shade and are adaptable to various soil conditions. Some varieties are semi-evergreen, adding winter structure to the landscape.

📍 Explore our selection of viburnums at D.R. Snell Nursery and find the perfect variety for your garden!

Transform Your Landscape This Spring!

Adding flowering shrubs to your landscape is the perfect way to kick off the gardening season with vibrant color, pollinator-friendly blooms, and year-round beauty. Whether you want the bright yellow of forsythia, the elegance of andromeda, or the continuous blooms of reblooming azaleas, we have the perfect selections for your yard.

🌷 Visit D.R. Snell Nursery today to explore our freshest spring shrubs, get expert planting advice, and start designing your dream landscape! 🌿

Houseplant Refresh: Spring Cleaning and Repotting Tips

Houseplant Refresh: Spring Cleaning and Repotting Tips

As winter fades and the days grow longer, it’s time to refresh your houseplants and help them transition into a season of new growth and vitality. Just like outdoor plants, houseplants wake up in spring, making it the perfect time for repotting, fertilizing, and pest prevention.

At D.R. Snell Nursery, we have everything you need to give your houseplants a fresh start—from high-quality potting soil to the best fertilizers and stylish decorative pots. Follow our spring cleaning and repotting guide to keep your indoor jungle happy and thriving all season long!

1. Assess Your Houseplants

Before diving into repotting and fertilizing, take a few moments to inspect your houseplants. Look for:
Overcrowded roots – If roots are growing out of drainage holes or circling inside the pot, it’s time to repot.
Compacted or depleted soil – Over time, soil loses nutrients and becomes dense, making it harder for roots to breathe.
Pest problems – Check under leaves and in the soil for pests like spider mites, fungus gnats, or mealybugs.
Yellowing leaves or stunted growth – These are signs your plant may need fresh soil and fertilizer.

📍 Need help choosing the right supplies? Stop by D.R. Snell Nursery for expert advice!

2. Time to Repot: When & How

When to Repot

Most houseplants benefit from repotting every 1-2 years, but fast growers or root-bound plants may need it sooner. Spring is ideal because plants are in active growth and recover quickly.

How to Repot Like a Pro

1️⃣ Choose the Right Pot – Pick a container 1-2 inches larger than the current one. Make sure it has drainage holes! Our selection of decorative pots at D.R. Snell Nursery will add a stylish touch to your space.
2️⃣ Use Quality Potting Soil – A light, well-draining mix is key. We recommend FoxFarm Coco Loco Potting Soil, which is rich in nutrients and holds moisture without becoming soggy.
3️⃣ Gently Remove the Plant – Loosen the roots carefully. If they’re circling the pot, gently tease them apart to encourage outward growth.
4️⃣ Add Fresh Soil – Place a layer of FoxFarm Coco Loco at the bottom of the new pot, set the plant inside, and fill around the roots. Press lightly to eliminate air pockets.
5️⃣ Water Thoroughly – Use a watering can with an easy-pour spout for even moisture. Be sure to place a saucer under the pot to protect furniture and floors!

📍 Find FoxFarm Coco Loco and beautiful new pots at D.R. Snell Nursery today!

3. Fertilize for Healthy Spring Growth

After a long winter, houseplants need a nutrient boost to fuel their spring growth. Start fertilizing about 2-4 weeks after repotting to avoid shocking the roots.

🌿 Best Fertilizer: We highly recommend Jack’s Classic Houseplant Fertilizer for vibrant leaves and strong root development. Its balanced nutrients provide steady, healthy growth without overfeeding.

Fertilizing Schedule for Spring

✔️ March-April: Begin feeding every 2-4 weeks, depending on plant type.
✔️ May-August: Increase to every 2 weeks as plants enter peak growing season.
✔️ September-February: Reduce or stop fertilizing as growth slows.

💡 Pro Tip: Don’t Fertilize a dry plant always fertilize after watering to prevent root burn!

📍 Pick up Jack’s Classic Houseplant Fertilizer at D.R. Snell Nursery for the best results!

4. Spring Pest Prevention

Warmer weather means more active pests, so take these steps to keep your plants pest-free:

🐜 Check for Pests Weekly – Inspect leaves (especially the undersides) and soil for tiny insects, webbing, or sticky residue.
💦 Wipe Leaves Clean – Dust buildup can attract pests. Use a damp cloth to gently clean leaves and improve light absorption.
🪲 Use Neem Oil or Insecticidal Soap – These natural treatments help control spider mites, mealybugs, aphids, and fungus gnats without harming your plants.
🌱 Keep Soil Fresh – Repotting with FoxFarm Coco Loco helps prevent fungus gnats by improving drainage.

📍 Visit D.R. Snell Nursery for organic pest control solutions!

5. Water Wisely

Spring’s warmer temperatures and increased light mean your plants will need more water. However, overwatering can be just as harmful as underwatering!

🚰 How to Water Smartly:
✔️ Use a watering can with an easy-pour spout for precise control—no more messy spills!
✔️ Check soil moisture before watering by sticking your finger 1-2 inches deep. Water only when it feels dry.
✔️ Use saucers to catch excess water and protect surfaces.

📍 Shop stylish watering cans and saucers at D.R. Snell Nursery!

Refresh Your Houseplants This Spring!

A little spring cleaning and repotting can work wonders for your houseplants, setting them up for lush, healthy growthall year long. With the right soil, fertilizer, and care routine, your indoor garden will thrive.

🌱 Ready to refresh your houseplants? Stop by D.R. Snell Nursery today for:
FoxFarm Coco Loco Potting Soil – for moisture balance and rich nutrients.
Jack’s Classic Houseplant Fertilizer – for strong, healthy growth.
Decorative pots, watering cans, and saucers – to complete your plant refresh.
Expert advice to help your houseplants flourish!

Let’s give your indoor jungle the care it deserves this spring—visit us at D.R. Snell Nursery today! 🌿

How to Plan a Cottage Garden: From Sweet Peas to Hollyhocks

How to Plan a Cottage Garden: From Sweet Peas to Hollyhocks

A cottage garden is a charming, whimsical space overflowing with flowers, rich textures, and a sense of unrestrained beauty. Unlike formal gardens with precise symmetry, a cottage garden embraces an informal, abundant planting style, often featuring classic flowers like sweet peas, hollyhocks, delphiniums, and foxgloves. Whether you’re starting from scratch or refining an existing space, this guide will walk you through everything you need to know about planning a romantic, flower-filled cottage garden.

Step 1: Choosing the Right Location

A successful cottage garden starts with selecting the ideal location. Most traditional cottage garden plants thrive in full sun, needing at least 6-8 hours of direct sunlight per day. However, if you have a partially shaded area, you can still achieve the look by incorporating shade-tolerant plants like foxgloves, hellebores, and columbines.

Soil quality is also essential—rich, well-draining soil will support a diverse mix of flowers. If your soil is heavy clay or sandy, amend it with organic matter like compost or aged manure to improve its structure and fertility.

Step 2: Designing the Layout

Cottage gardens are known for their informal, overflowing look, but they still require thoughtful planning. Consider the following elements when designing your layout:

1. Layering for Height and Depth

A well-planned cottage garden has a sense of verticality, with plants arranged by height:

  • Tall flowers (4-8 feet): Hollyhocks, foxgloves, delphiniums, and sunflowers create a dramatic backdrop.
  • Medium-height plants (2-4 feet): Phlox, roses, daisies, and salvias add fullness and color.
  • Low-growing plants (under 2 feet): Sweet peas, violets, alyssum, and creeping thyme fill in gaps and soften borders.

Planting in clusters or drifts rather than single rows creates a more naturalistic look.

2. Pathways and Structures

Incorporating meandering pathways made of gravel, stepping stones, or brick enhances the romantic charm of a cottage garden. Arches, trellises, and obelisks provide support for climbing plants like sweet peas, clematis, and roses, adding vertical interest.

3. Mixing Flowers and Edibles

Traditionally, cottage gardens combined flowers, herbs, and vegetables. You can integrate edibles like lavender, chives, thyme, strawberries, and even tomatoes for both beauty and function.

Step 3: Choosing the Right Plants

A well-balanced cottage garden includes a mix of annuals, perennials, biennials, and climbers to ensure continuous blooms throughout the growing season.

1. Classic Cottage Garden Flowers

  • Sweet Peas (Lathyrus odoratus) – These fragrant climbers bloom profusely in spring and early summer, ideal for trellises and archways.
  • Hollyhocks (Alcea rosea) – Towering spires of large, colorful flowers that add vertical drama.
  • Foxgloves (Digitalis purpurea) – Bell-shaped blooms loved by pollinators, perfect for shady spots.
  • Delphiniums – Vibrant blue and purple spikes that provide striking color.
  • Peonies – Lush, romantic blooms that return year after year.
  • Roses – Classic shrub or climbing varieties like David Austin roses work beautifully.
  • Daisies (Leucanthemum spp.) – Simple, cheerful flowers that add a meadow-like feel.

2. Fragrant and Pollinator-Friendly Choices

  • Lavender – Aromatic and perfect for edging paths.
  • Phlox – Fragrant clusters of summer flowers in shades of pink, white, and purple.
  • Bee Balm (Monarda) – Attracts hummingbirds and adds a pop of color.
  • Catmint (Nepeta) – A lavender-like plant that bees and butterflies adore.

3. Filler and Ground Cover Plants

  • Alyssum – A low-growing plant that spills over borders with tiny, fragrant blooms.
  • Creeping Thyme – Great for softening the edges of paths.
  • Violas and Pansies – Early bloomers that add cheer in spring and fall.

Step 4: Planting and Maintenance

1. When and How to Plant

  • Perennials and shrubs should be planted in early spring or fall to allow root establishment.
  • Annuals like sweet peas can be direct sown in early spring after the last frost.
  • Biennials like foxgloves and hollyhocks need to be started one year in advance for blooms the following season.

2. Watering and Fertilizing

  • Water deeply but infrequently, aiming for about 1 inch per week.
  • Mulch around plants to retain moisture and suppress weeds.
  • Use organic fertilizers like compost tea or fish emulsion to keep plants thriving.

3. Pruning and Deadheading

Regular deadheading (removing spent flowers) encourages more blooms. Some perennials, like delphiniums and phlox, can be cut back after blooming to encourage a second flush of flowers.

Step 5: Adding Finishing Touches

1. Garden Ornaments and Accessories

A true cottage garden embraces charm and whimsy. Consider adding:

  • Birdbaths and birdhouses to attract wildlife.
  • Rustic wooden benches nestled among flowers.
  • Vintage containers and wheelbarrows planted with blooms.

2. Seasonal Interest

Extend the garden’s appeal by adding elements for every season:

  • Spring: Daffodils, tulips, and primroses.
  • Summer: Roses, hollyhocks, and sweet peas.
  • Fall: Asters, sedum, and ornamental grasses.
  • Winter: Evergreens, hellebores, and dried seed heads for structure.

Conclusion

Planning a cottage garden is as much about embracing creativity and spontaneity as it is about structure. By layering plants, incorporating romantic climbers, and mixing perennials with annuals, you’ll create a timeless, enchanting retreatfilled with beauty year after year. Whether you’re drawn to the fragrance of sweet peas or the towering presence of hollyhocks, your cottage garden will be a place of joy, relaxation, and natural splendor.

Now, grab your spade and start planting—your dream cottage garden awaits!


I

Soil 101

How well do you understand your soil? It’s more than just dirt, and the more you learn about soil, the better you’ll be able to care for it to ensure a stunning landscape, healthy lawn and productive garden.

All About Soil

The four elements of soil are minerals, water, air and organic matter. Different combinations of the four elements create the four main categories of soil: sand, silt, clay and loam. Of course, we all want loam – that rich, vibrant soil thriving with beneficial bacteria and with a smooth but crumbly texture ideal for root growth. Unfortunately, true loam soils are rare, especially around homes where topsoil was removed and heavy machines compacted the remaining soil during construction or renovation. Most of us have clay soil, which has finer particles that compact easily into a dense mass. Clay soils also retain more water and can easily become too soggy or waterlogged for healthy plants. But just because your soil may be clay, it doesn’t have to stay that way!

Improving Soil

Improving soil is actually quite easy. All soils are improved by adding minerals and organic material that help balance out the overall components of the soil’s structure.

Before adding minerals, test the soil to determine its pH (acidity or alkalinity) and determine any mineral deficiencies. Lime decreases soil acidity, gypsum adds calcium and helps break up heavy clay and sulfur increases acidity. Other soil amendments to add to a clay soil include sand, cottonseed meal and peat moss, all of which will help improve the drainage and structure.

Organic matter refers to plant or animal materials decomposed into compost or “humus.” This residue comes from leaves and other plant materials, as well as certain animal wastes. Grass clippings, paper and certain types of decomposing food can also be ideal compost. The quality depends on the origin of the original biodegradable matter. Many people make their own compost using bins in which materials are mixed until they decompose. Others purchase finished compost. When compost is added to soil, it releases nutrients that are vital for healthy plants, and healthy bacteria and microbes will thrive in organically-rich soil.

The Magic of Mulch

Mulching is a simple way to add biodegradable materials to the soil. Evergreen needles, tree leaves, lawn clippings, chicken manure, etc., can be worked into the soil to decompose. This process improves the air spaces between the soil particles and rearranges the sand, silt and clay to produce optimum soil structure, improving the water retention and drainage balance and making nutrients available to plants.

When soil has proper structure and sufficient nutrients for healthy plants, optimum health has been achieved, and great soil will lead to great landscaping, turf and gardens. Congratulations and keep on growing!

soil_4
soil_1
soil_2
soil_3

What is “pH?” Why Is It Important?

Devised in 1909, the pH scale measures the concentration of hydrogen ions in a solution. The scale ranges from 0-14. Pure water is “neutral” and has a pH of 7, midway between 0 and 14. If a solution has a low concentration of hydrogen ions, the rating will be a higher number and is considered basic or alkaline. Likewise, a high concentration of hydrogen ions rates a lower number and is considered acidic.

What pH Means to Your Garden

There are four important reasons to monitor your soil’s pH level:

  1. pH affects the availability of other nutrients in the soil. If the nutrients are not available because they are chemically bound to something else, plants can’t use that nutrient.
  2. A high or low pH level in the soil allows some plant diseases to multiply more quickly, infecting an entire landscape or garden.
  3. Most organisms living in the soil have pH preferences. For example, earthworms are not as plentiful in acidic soil.
  4. Most plants have specific pH requirements to flourish. Those specific requirements are what the plants need to absorb nutrients more efficiently and resist pests more effectively.

Where Soil pH Occurs

Acidic soil generally occurs in heavy rainfall areas, as the rain will pull acidic compounds from the air and allow them to leach into the soil. Alkaline soil, then, is more common where there is less rain. However, this is just a generalization and neighbors across the street from each other may have a large pH difference. Reasons could include the origin of topsoil brought in, the tillage done in the area and prior occupants’ gardening habits. Even simple changes like how drain spouts are positioned or a watering schedule can impact pH.

The pH Your Plants Need

Most plants will grow well in the neutral zone of 6.5-7.0. However, some plants grow best in specific soil pH conditions. Interestingly, hydrangeas grow well in both slightly acidic and slightly alkaline soils, but the flowers will be blue in acidic soil or pink in alkaline soil. The colors and flavors of fruits and vegetables may also vary somewhat depending on the soil’s pH, even if the plant will thrive in a wider range.

This chart illustrates how slight pH changes can dramatically impact which plants will thrive in certain soils…

Highly Acidic Conditions

(pH between 5 and 6)

Slightly Acidic Conditions

(pH between 6 and 6.5)

Slightly Alkaline Conditions

(pH between 7 and 7.5)

Rhododendrons Blueberries Arrowwood Viburnum
Azaleas Magnolias Box Elder
Camellias Ferns Locust
Pieris Firs Philadelphus
Astilbe Viburnum davidii Hellebores

As you see, pH can influence your gardening choices. Knowing the pH of your soil is the first step towards understanding your soil and improving your garden. By knowing the pH, you may choose the best plants for your site. You may also decide to amend your soil to increase or decrease the pH to grow a wider variety of plants.

We offer several inexpensive and easy-to-use pH test kits. We also offer amendment advice and can help you choose the best plants for your soil’s condition. Stop in for pH help today and we’ll help you make the most of the natural acidity or alkalinity of your soil, or else help you turn that soil into just the pH you desire!

ph_4
ph_1
ph_2
ph_3

Aphids

One of the most common insects, and one of the most potentially plant-threatening, is the aphid. There are actually many types of aphids – more than 4,000 in all. Some feed on specific plants and others are not so choosy. They all attack the newer plant growth and suck sap from a plant’s internal circulation system, the phloem, in stems and leaves. This can decrease the plant’s growth rate, discolor or disfigure leaves, cause galls to form and transmit plant diseases. Strong aphid infestations can lower produce yields and eventually kill plants altogether.

Recognizing Aphids

Aphids – also called plant lice, blackflies and greenflies – are easy to recognize. They’re about one-eighth to one-third of an inch long, usually pale green but can be almost colorless, pink, black or brown. Their pear-shaped bodies have six legs, small tail-like structures and long, jointed antennae. Aphids are soft-bodied and are mainly found in dense groups on the underside of new plant growth, where they leave behind a sticky residue called honeydew. Ants are attracted to aphid honeydew, so a nearby ant infestation or very active ant colonies may also indicate that aphids are present. Aphids are most common in spring, and die off rapidly in the hot temperatures of summer.

Controlling Aphids

Fortunately, controlling aphids is fairly easy. Most full-spectrum chemical insecticides kill aphids. Other, less strenuous products include plant extracts, neem oil, plant oils and insecticidal soap water sprays. A regular spraying with strong blasts of water or hand picking will control many infestations, especially when just a few aphids have been noticed. Many gardeners release ladybugs (lady beetles) to eat the aphids or parasitic wasps to lay their eggs in the aphid, but because these natural predators will quickly spread out, large applications of hundreds of predators may be needed to effectively control an aphid infestation. Another option is to encourage insect-eating birds to visit the yard – chickadees, titmice and warblers all especially love aphids and can provide superior natural pest control. Even hummingbirds will happily munch on aphids.

It’s best to control aphids early. As their numbers increase, the drying leaves begin to roll over them, thus protecting the aphids from controls such as soaps, oil and water sprays, and making it harder to effectively eliminate these pests. If you think you have aphids or you’re not sure what you have, bring in a sample. We’ll take a look and suggest the best way to eliminate the problem and help you protect your plants.

aphids_3

aphids_1

aphids_2